

How To Lock Object Movement In Unity Animations
Tutorial: Scripting Root Motion for "in-place" humanoid animations
Root Movement - how information technology works
Body Transform
The Body Transform is the mass center of the character. It is used in Mecanim's retargeting Applying animations created for i model to some other. More info
See in Glossary engine and provides the most stable displacement model. The Body Orientation is an average of the lower and upper torso orientation relative to the Avatar An interface for retargeting blitheness from one rig to another. More info
See in Glossary T-Pose The pose in which the character has their arms straight out to the sides, forming a "T". The required pose for the character to be in, in order to make an Avatar.
Meet in Glossary .
The Torso Transform and Orientation are stored in the Blitheness Clip Blitheness information that tin can be used for blithe characters or elementary animations. It is a simple "unit of measurement" piece of motion, such as (1 specific example of) "Idle", "Walk" or "Run". More info
Run into in Glossary (using the Muscle definitionsThis allows yous to accept more intuitive control over the grapheme's skeleton. When an Avatar is in identify, the Animation system works in musculus space, which is more than intuitive than bone space. More info
See in Glossary fix up in the Avatar). They are the but world-space curves stored in the Blitheness Prune. Everything else: musculus curves and IK goals (Easily and Feet) are stored relative to the body transform.
Root Transform
The Root Transform is a projection on the Y plane of the Body Transform and is computed at runtime. At every frame, a change in the Root Transform is computed. This change in transform is so applied to the Game Object to get in move.
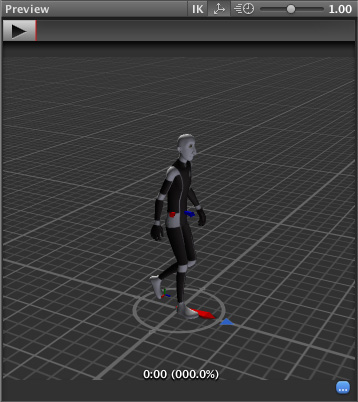
Animation Clip Inspector
The Blitheness Clip Editor settings - Root Transform Rotation, Root Transform Position (Y) and Root Transform Position (XZ) - allow you control the Root Transform project from the Body Transform. Depending on these settings some parts of the Body Transform may be transferred to Root Transform. For example you tin can decide if y'all want the motion Y position to be part of the Root Motility (trajectory) or function of the pose (torso transform), which is known as Baked into Pose.
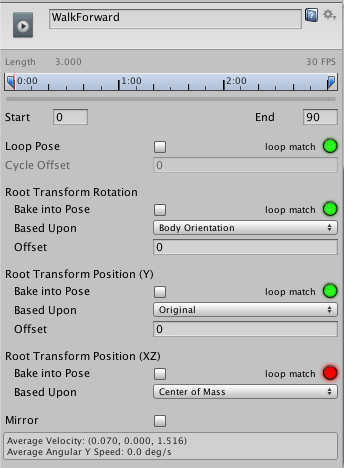
Root Transform Rotation
Bake into Pose: The orientation volition stay on the torso transform (or Pose). The Root Orientation will exist abiding and delta Orientation will be identity. This means that the Game Object volition not be rotated at all past that AnimationClip.
Only AnimationClips that take similar start and stop Root Orientation should use this option. You will have a Greenish Lite in the UI (User Interface) Allows a user to collaborate with your application. Unity currently supports three UI systems. More info
Come across in Glossary telling you lot that an AnimationClip is a adept candidate. A suitable candidate would exist a straight walk or a run.
Based Upon: This lets y'all gear up the orientation of the clip. Using Trunk Orientation, the clip will be oriented to follow the forrad vector of torso. This default setting works well for almost Motion Capture (Mocap) data like walks, runs, and jumps, only it will fail with motion like strafing where the motion is perpendicular to the trunk's forward vector. In those cases you lot can manually adjust the orientation using the Offset setting. Finally you lot have Original that will automatically add the authored offset found in the imported clip. It is commonly used with Keyframed data to respect orientation that was prepare by the artist.
Beginning: used to enter the offset when that option is chosen for Based Upon.
Root Transform Position (Y)
This uses the aforementioned concepts described in Root Transform Rotation.
Bake Into Pose: The Y component of the motion will stay on the Torso Transform (Pose). The Y component of the Root Transform will be constant and Delta Root Position Y will exist 0. This means that this clip won't change the Game Object Summit. Again you have a Green Low-cal telling you that a prune is a good candidate for blistering Y motion into pose.
Most of the AnimationClips will enable this setting. Only clips that will modify the GameObject The fundamental object in Unity scenes, which tin represent characters, props, scenery, cameras, waypoints, and more than. A GameObject's functionality is divers by the Components attached to information technology. More info
See in Glossary height should have this turned off, like jump up or downwards.
Note: the Animator.gravityWeight is driven by Broil Into Pose position Y. When enabled, gravityWeight = 1, when disabled = 0. gravityWeight is blended for clips when transitioning betwixt states.
Based Upon: In a similar way to Root Transform Rotation you tin cull from Original or Mass Center (Torso). There is as well a Feet option that is very convenient for AnimationClips that alter summit (Bake Into Pose disabled). When using Feet the Root Transform Position Y will match the lowest pes Y for all frames. Thus the blending signal ever remains around the feet which prevents floating trouble when blending or transitioning.
Offset: In a similar way to Root Transform Rotation, you tin manually adjust the AnimationClip height using the Offset setting.
Root Transform Position (XZ)
Again, this uses same concepts described in Root Transform Rotation and Root Motion Position (Y).
Broil Into Pose volition ordinarily be used for "Idles" where you desire to force the delta Position (XZ) to be 0. It will stop the accumulation of small deltas drifting after many evaluations. It can besides exist used for a Keyframed clip with Based Upon Original to force an authored position that was set by the artist.
Loop Pose
Loop Pose (like Pose Blending in Blend Trees or Transitions) happens in the referential of Root Transform. In one case the Root Transform is computed, the Pose becomes relative to it. The relative Pose difference between Start and Stop frame is computed and distributed over the range of the prune from 0–100%.
Generic Root Motility and Loop Pose
This works in essentially the aforementioned as Humanoid Root Motility, but instead of using the Body Transform to compute/project a Root Transform, the transform set in Root Node A transform in an animation hierarchy that allows Unity to found consistency between Blitheness clips for a generic model. It besides enables Unity to properly blend between Animations that have not been authored "in place" (that is, where the whole Model moves its globe position while animating). More than info
See in Glossary is used. The Pose (all the bones which transform below the Root Motion bone) is fabricated relative to the Root Transform.
Tutorial: Scripting Root Movement for "in-place" humanoid animations
Source: https://docs.unity3d.com/Manual/RootMotion.html
Posted by: hallthosed.blogspot.com
0 Response to "How To Lock Object Movement In Unity Animations"
Post a Comment